There are a number of situations where you might need to boot from a pen drive instead of your optical drive. Your DVD drive might not be working or you might not have a physical OS disk but an image stored in your hard disk.Some of the netbooks today don't have an optical drive. Whatever the reasons, sometimes it is useful to know the way to make a bootable pen drive.
There are two ways in which you can create a bootable pen drive from which you can install an operating system from a pen drive. You can either use the manual method of using the command prompt by typing a series of commands or you can use softwares that can do the job for you.
There are a number of softwares available that can make a bootable pen drive such as WinTo Flash, Unebootin, A bootable USB, MakeBootable etc. Most of them could be used with any version of windows.
Given below are the steps to do it the command prompt way.
1: You need at least 4GB Pen drivefor Windows 7. It’s much better to use a 8GB one. Plug your pen drive into machine.
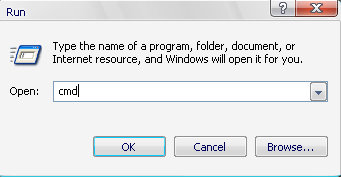
2: Open command prompt as administrator by pressing windows+R key then type cmd.

3: Then run diskpart utility from command prompt, by typing ‘diskpart’ on command prompt and pressing enter. This will run the diskpart utility in a separate windows, which is shown in 2nd picture below:

4: Then type ‘list disk’ and press enter. This will tell you about the disk information on your system. Locate your pen drive by observing its size. You can see the size column of the disk and here we can see that ‘disk 1′ is our pen drive.

The names may be different. Change the number in the command according to your pen drive.
5: Select the pen drive by executing the ‘select disk 1’ command. You can also enter ‘detail disk’ to see the details of the disk after selecting it to verify that you have selected the correct disk.

6: Now clean your drive by running the ‘clean’ command.

This will tell that the selected disk has been cleaned.
7: To create the primary partition, type ‘create partition primary’ command. Then select the primary partition by ‘select partition 1’.

8: To active this partition, type ‘active’. So that disk part utility can mark the primary partition active.

8: You have to format the pen drive in the FAT32 format. Run the command ‘format fs=FAT32 quick’ without the quotes.

Wait for 100% completion of the format process.
9: Assign the volume by typing ’assign’ command.

10: Now type ‘exit’ to exit from the disk part utility.

11: Mount the IMAGE of the windows CD/DVD on the virtual drive or put the CD on the optical drive .
- Now go to My Computer, and open the contents of DVD Drive. Press ‘ctrl+a’ to select all contents and copy all the contents by pressing ‘ctrl+c’.
- Now go back to My Computer and open the USB Drive and press ‘ctrl+v’ to paste all the contents of DVD into the USB Disk.
12: Boot from the pen drive to install the windows.
There are two ways in which you can create a bootable pen drive from which you can install an operating system from a pen drive. You can either use the manual method of using the command prompt by typing a series of commands or you can use softwares that can do the job for you.
There are a number of softwares available that can make a bootable pen drive such as WinTo Flash, Unebootin, A bootable USB, MakeBootable etc. Most of them could be used with any version of windows.
Given below are the steps to do it the command prompt way.
1: You need at least 4GB Pen drivefor Windows 7. It’s much better to use a 8GB one. Plug your pen drive into machine.
2: Open command prompt as administrator by pressing windows+R key then type cmd.
3: Then run diskpart utility from command prompt, by typing ‘diskpart’ on command prompt and pressing enter. This will run the diskpart utility in a separate windows, which is shown in 2nd picture below:
4: Then type ‘list disk’ and press enter. This will tell you about the disk information on your system. Locate your pen drive by observing its size. You can see the size column of the disk and here we can see that ‘disk 1′ is our pen drive.
The names may be different. Change the number in the command according to your pen drive.
5: Select the pen drive by executing the ‘select disk 1’ command. You can also enter ‘detail disk’ to see the details of the disk after selecting it to verify that you have selected the correct disk.
6: Now clean your drive by running the ‘clean’ command.
This will tell that the selected disk has been cleaned.
7: To create the primary partition, type ‘create partition primary’ command. Then select the primary partition by ‘select partition 1’.
8: To active this partition, type ‘active’. So that disk part utility can mark the primary partition active.
8: You have to format the pen drive in the FAT32 format. Run the command ‘format fs=FAT32 quick’ without the quotes.
Wait for 100% completion of the format process.
9: Assign the volume by typing ’assign’ command.
10: Now type ‘exit’ to exit from the disk part utility.
11: Mount the IMAGE of the windows CD/DVD on the virtual drive or put the CD on the optical drive .
- Now go to My Computer, and open the contents of DVD Drive. Press ‘ctrl+a’ to select all contents and copy all the contents by pressing ‘ctrl+c’.
- Now go back to My Computer and open the USB Drive and press ‘ctrl+v’ to paste all the contents of DVD into the USB Disk.
12: Boot from the pen drive to install the windows.





 Windows 8 has a new feature that runs automatic maintenance tasks like software updates, security scanning, and other diagnostic tests daily. By default, it runs them at 3AM, of if you're using your computer, the next time your computer becomes idle. You can change this time in the Action Center, as well as tell Windows whether you want to wake your computer up to perform these tasks. You can also perform the maintenance manually from the Action Center, if you desire.


 Remember in Windows 7, when you created a library, it had that ugly, nondescript icon? And you had to go through some


